
Last Updated on October 24, 2022
Having a properly adjusted rear derailleur is one of the core rules of mountain biking as this is what drives momentum whenever you ride. It’s just that important no matter what kind of drivetrain you’re using!
Having one that isn’t set up properly can lead to a lot of damage on your bike and components. You might even lose parts like the jockey wheel and bolts, which you’ll surely have a hard time finding replacements for.
Installing one isn’t also that easy, especially if it’s your first time. Not only do you need to properly set it up in place, but you also need to fine-tune it.
That’s what this article is about.
Here, we will give you a step-by-step guide on how to install a rear derailleur on a mountain bike — the right and easy way.
The Tools You’re Going to Need
You need the right set of tools to properly install your rear derailleur.
These tools are:
- Allen keys
- Cross head Phillips screw driver
- Cable cutter
- Pair of pliers
- Chain break tool or chain pliers
Steps to Install the Rear Derailleur
Current mountain bike derailleurs are installed through the same method. So, you shouldn’t have to worry if you have a Shimano or SRAM drivetrain.
Step 1: Attach the rear derailleur
Use a 5 mm Allen wrench to attach the thread of your rear derailleur to the derailleur hanger. Then tighten it to about 8 to 5 Nm. Make sure it’s properly placed on the alignment block of the hanger so it’s firm and won’t fall out when you ride aggressively.
Step 2: Install the chain
Put your new chain into the largest cog and biggest chain ring. Wrap the chain to each end without going through the derailleur.
Then add two links and cut the remaining links with a chain cutter. Thread the chain into the derailleur and lock it in place using a missing link.
Related: How to Fix the Chain From Slipping on a Specialized Pitch Mountain Bike
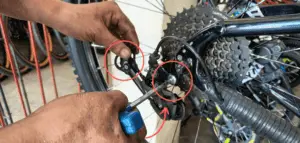
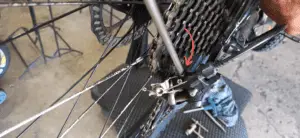
Step 3: Limit screw adjustments
The limit screws are designed to limit the movement on how far the derailleur can move away from the cogs. This prevents the chain from falling off the back of the cassette or to the front where it can hit and scratch the frame.
Every derailleur has the same design for adjustment. But the location of the limit screws varies from every model.
Low limit screw
Use a crosshead screwdriver to adjust the limit screws. Push the derailleur until the chain reaches the biggest cog. Then adjust the low limit screw until the upper pulley is in line with the largest cog of the cassette.
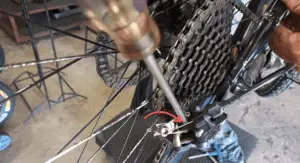
High limit screw
Let go of the derailleur and put it in the smallest cog of the cassette. Adjust the high limit screw by making sure that the upper pulley is in line with the smallest cog.
You’ll know if the limit screw adjustment is correct if they won’t skip and can change to another gear once you shift.
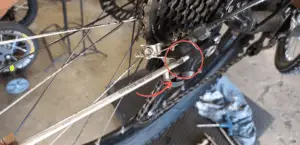
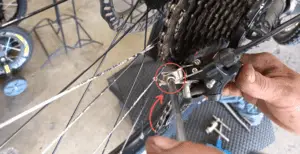
Step 4: Chain gap
Adjust the chain gap between the top pulley and the biggest cog of the cassette. Use a screwdriver to move the screw at the back of the derailleur.
SRAM recommends getting the pulley near to the cassette as possible. But the general rule to follow is the gap needs to be ¼ of an inch or 6 mm.
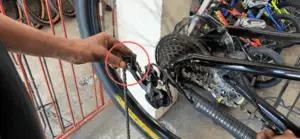
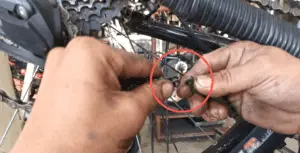
Step 5: Attaching the shift cable
You can attach your shift cable once your derailleur is set up. This then lets you connect the derailleur to the shifter.
Installation
- Ensure that the shift cable is properly installed to the frame and the housing and routing doesn’t limit its movement.
- Release the cable out of your shifter by shifting it into the hardest gear setting.
- Turn the barrel adjuster clockwise to tighten it.
- Use a pair of pliers to pull the cable tightly. Secure it to the bolt lock of the derailleur using an Allen wrench.
- Move the crank while cycling through the gears of the cogs or sprocket to see if it shifts properly.
- Repeat the previous steps until there’s no more slack in the cable and the derailleur is properly shifting.
- Cut the extra cable using a cable cutter and install a cable end on it.
Step 6: Fine-tuning
It’s then time to fine-tune your rear derailleur to get it to shift smoothly once you’re done with the general adjustments. Do this by loosening the barrel adjusters at the shifter or the rear derailleur.
Cycle the gears while spinning the cranks to see if there are any jumping or clicking motions. You can move the barrel adjuster for 1 or 2 clicks until the gears shift easily with no issues.
Conclusion

Following the steps above allows you to make the most out of your mountain bike ride. This not only lets you shift the gears properly and get the right momentum. But it also makes you faster and puts you in better control of your bike.
Hit the trails and try it out yourself. You’ll see what we’re talking about!
Till then, ride safe and have fun.
